Friday, August 31, 2012

Corn Casserole:Gluten Free Style


     If you have ever been to a pot luck in the Midwest, then you have probably seen a corn casserole. It is a suped up cornbread type side dish. SO good!!! However, if you are a person who eats gluten free you quickly realize that the "simple" recipe of a couple cans of corn and a Jiffy Mix aren't going to work for you. That's where I come in......I have converted it to gluten free and it is still SO yummy! Get excited!

Gluten Free Corn Casserole

1/2 C. Margarine or Butter, Melted
1/2 C. Corn Meal
1/2 C. GF Flour Mix
2 T. Sugar
2 tsp. Baking Powder
1/2 tsp Salt
1 Egg
1 C. Sour Cream
1 Can of Creamed Corn
1 Can of Whole Kernel Corn, drained
1/3 C. Diced Onion OR 1 T. Minced
1/4 tsp. Black Pepper

Combine the ingredients together and mix well. Baked in a 8x8 casserole dish sprayed with cooking spray. Bake at 350 deg. for 30 minutes covered with foil, then uncover and bake another 30 minutes.
The edges are crispy and the top is slightly brown.
The inside is moist and amazing.
 
I hope you enjoy my pot luck style recipe turned gluten free.
 
-Jessica

My secret for you: Re-heating pizza to make it new again


     Want to know a secret?? How about a secret that will forever change your life? I have one for you today. I'm going to teach you the secret way to re-heat pizza. It is life changing!! You will want to name your first born after me when you are done reading this......unless it's a boy.
     We all hate soggy cold pizza. Soggy warm pizza comes in at a close second place. You put the pizza in the microwave and it comes out warm, but soggy crust. You re-heat it in the oven and it comes out overcooked and dry. ICK! So here is your life changing tip of the day!! You will need a skillet, piece of foil, and your cold pizza slice.
Place your slice into the pan. Turn the heat on very low and cover with foil.
The key is low flame and the foil to keep the heat in.
 
Check the pizza after 4 or so minutes to see if it is warm enough. You don't want to burn the bottom so be sure that heat is very low. Let the foil do it's job of keeping the heat in and warming the toppings while the direct heat from the burner crispies up your crust.
 

You know when it is warm because the cheese will get that shiny look to it, and of course it will feel warm to the touch. Once it is warm then serve immediately. You will never go back to putting pizza in the microwave again!

     I hope that you enjoy this life changing tip. I ONLY re-heat my pizza this way. I have this perfect little skillet and it is just the right size for one slice. The pizza tastes just like it did the night before (sometimes better) if you re-heat it this way. Enjoy!

-Jessica

Tuesday, August 28, 2012

Old chair with a new purpose.....craftyness!!


    You know that I have a slight Pinterest addiction. Well, this is another Pinterest project. A couple of months ago I had run across a pin for a old chair turned into a planter. Sooo cute. So, I have been keeping my eye out at sales for the perfect old chair. This past weekend I found my chair. It was only fifty cents! It was missing a seat (which I would have removed anyways), but very sturdy and ready to be painted and turned into a planter. I couldn't pass it up.......
Before......
 
 
I decided the chair didn't need much work before painting other than to wipe it down and get the dust and dirt off of it.
Then I started painting........
Once the paint was dry. I cut a square of metal window screen material and used a staple gun to secure it to the rungs on the chair, leaving a pocket to hold dirt and plants. (The pinterest pin used chicken wire, but you have to purchase a whole roll of that and only need a small amount. Screen can be purchased in smaller amounts and my parents had some laying around they donated to my project).
I then lined the mesh with coir pot liners. I bought 4 round bowl shaped liners and cut them to fit. I shaped them over the edge to cover the mesh.
The next step is to put some dirt down on the coir liners and plant some of your favorite plants. However, summer is almost over here, so I will wait until next season to put the dirt and plants into my chair. For now it will just hold a house plant or maybe a mum when those come into season.
This project was super easy and super cheap. I think it turned out cute and I can not wait to plant some flowers in it next season.
 
-Jessica


Friday, August 24, 2012

Guilt Free, Gluten Free, Zucchini, Pasta Substitute

 
    I was sitting around trying to figure out what I was going to make for supper tonight. Ok, let me rephrase that......trying to decide on something semi-healthy for supper. When out of nowhere, it was like Dr. Oz heard my thoughts.....he had a person on his show talking about using zucchini for pasta.
     I absolutely LOVE spaghetti squash in place of pasta, so I had to try the zucchini. It is soooooo easy to do and it tasted very good. I can't wait to try it out with some meat sauce sometime soon.
     Ok, so here is what you need to do. Wash and dry your zucchini. Use your vegetable peeler to slice the zucchini into long thin strips. Saute the strips in a little olive oil for about 5 minutes. Add your sauce and toss to coat. Ta-Da....you are done! Dinner is served in less than 10 minutes. 
For my pasta fake out, I used zucchini and yellow squash. Use your veggie peeler to cut the zucchini into long strips. Saute for 5 minutes and add your sauce.
Toss the "pasta" with the sauce and serve.
Ta-Da!!! You can feel a little better about that Alfredo sauce when you are putting it on top of veggie pasta.
 
Enjoy!
 
-Jessica


Wednesday, August 22, 2012

Chocolate Overload Volcanic Cuppeycakes


     Oh my gosh you guys....I'm SO tired. I slaved away ALL day on these cuppeycakes for you. Ya, that's a big fat lie. HA! I made these super simple cuppeycakes today because I was craving some chocolate. They took minimal amounts of my time and satisfied my craving. Now who is going to come and pick up these leftovers so I don't eat them all????
These evil cuppeycakes start with your favorite chocolate box cake mix. I used a Betty Crocker GF mix. I topped the batter with mini chocolate chips before baking. Then let them cool after they were done.
The next step couldn't get much easier....2 pudding cups (I used Snack Pack in cuppeycake flavor, they are even labeled gluten free...love that!) You are going to pipe the pudding down into the cuppeycake (this is the volcanic part)
Pipe the pudding into the center of the cuppeycakes.
Frost with canned milk chocolate frosting (Betty Crocker labels theirs clearly as GF) and then top with mini chocolate chips. Refrigerate and serve cold.

Yum.....so easy, but could fool anyone that you spent alot of time on this!
Time to have a little bite...
Oooo look at the middle.....ooey gooey chocolaty yummyness!


     I hope you enjoy these yummy chocolaty cuppeycakes. They are super simple to make and your loved ones will think you spent all day on them.
 
-Jessica


Sunday, August 19, 2012

Melty Cheesy Banana Peppers from Heaven


    Sometimes in life you just have to break the rules. Yep, that's right folks.....I'm a rule breaker. Well, sort of. If you call battering and frying foods rule breaking then I'm in! I try not to eat alot of fried food. However, once in a while you have to break the healthy eating rule and just go for it. I would like to think that this recipe really goes for it. Breaded, fried, and topped with cheese. I'm sure it's probably illegal in at least 3 states and a couple of small island countries.
     The origin of this idea comes from several years ago. When I was a little girl I had visited one of our neighbors with my parents. The neighbor gave us a plate of these banana peppers that she had breaded, fried, and frozen. She said you just heat them up and put Velveeta cheese on them. Oh my goodness, from that day on our family was HOOKED on these. So thank you Louise for handing us that plate of peppers.
     Of course, since going gluten free I have had to adapt and change many recipes. This happens to be one that I had to find a way to make gluten free. I seem to make a different batter each time I try the recipe, but the one that I made this time was super good. So I have to get it written down so that I don't forget it for next time.
      This batter recipe yielded crunchy outside and cooked veggies inside....perfect!

Veggie Batter

1/3 C. Corn Starch
2/3 C. All Purpose Gluten Free Flour (I used Bob's Red Mill)
1 tsp. Baking Powder
2/3 C. Milk

Mix the ingredients together with a whisk. You may have to add additional flour or milk to adjust the thickness of the batter.

Dip your veggies into the batter and fry in hot oil. (squash, banana peppers, okra, zucchini)

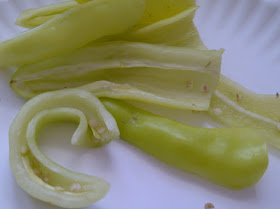
Wash the banana peppers, cut them in 1/2 lengthwise and be sure all the seeds are removed.
Dip the peppers into the batter, be sure that all sides and crevices are coated.
Fry in hot oil until golden brown.

Drain off the excess oil on a cookie sheet lined with paper towels.
Top with pieces of Velveeta cheese.
Bake at 250 until cheese is melted OR microwave to melt cheese.

Cheesy melty goodness sent from heaven....mmmmm


Sunday, August 12, 2012

Nutella and White Chocolate Chip Cookies


     Sometimes there are occasions in life that deserve to be celebrated. Today I had one of those surprise moments. I was cruising along on Facebook....and Udi's Gluten Free Foods had posted a link to a recipe. It sure looked good....Mozzarella Cheese Bites. Then I got to thinking...that picture sure looks familiar. Wow, that looks like the dishes that I have at my house. That's MY recipe that Udi's posted!!! Udi's had linked to my Mozzarella Cheese Bites Recipe. It soon became a fun afternoon of watching my blogger stats (I'm a bit of a stats nerd when looking at my posts). I watched that post get over 1,500 views in 20 minutes! It has been pinned like crazy on Pinterest. It has also brought lots of new Silly Yaks to the USASillyYaks facebook page. It has been about 2 hours since Udi's put my link up and about 3,500 people have viewed the recipe. I happen to think that is AWESOME. It blows my mind. So long story short.....I thought we should celebrate with some cookies. Get excited!
     A while back I had experimented with a Nutella cookie. It tasted amazing, but looked like a cow pattie. A very tasty cow pattie though. So I thought today I would give that recipe another shot. Well I adjusted a few things and have still ended up with the same result....cow pattie cookies ha. So these aren't a cookie that you would want to serve for the Queen. They are sort of ugly. However, they taste SO good that I had to share the recipe anyway. I hope you enjoy these ugly amazing cookies.

Nutella and White Chocolate Chip Cookies

3/4 C Nutella
1 C. Brown Sugar
1 Egg
1/3 C. Gluten Free Flour Mixture
1tsp Baking Soda
3/4 C White Chocolate Chips

Pre heat the oven to 350 deg. In a bowl combine the Nutella, brown sugar, egg, flour, and baking soda until well mixed. Add in the chips and stir until combined.

Drop the cookie dough onto a cookie sheet sprayed with cooking spray. Bake for 10 minutes at 350 deg. Remove from the oven and allow the cookies to cool and set up for 4 minutes on the baking sheet before removing them.

The cookies spread out and will not be "pretty" cookies. However, I believe their taste makes up for their looks. Enjoy!!

-Jessica

Mmmmm white chocolate
The dough will be pretty thick, but for some reason it thins out in the oven

Ugly, but so good!