Friday, March 16, 2012

Flip Flop Wreath.....perfect for Summer!


     You may not know this about me, but I'm a flip flop addict. I love love love flip flops!! I love to wear them. I love to wear shirts that have flip flops ON them. I love to write on note pads that have flip flops. I even have some flip flop shaped pillows for my giant chair in my office. Oh and a flip flop accent rug. I'm slightly obsessed.
     When I decided to start a Relay for Life team in support of my Mom, the obvious theme for our team was Flip Flops. We named our team Flip Flopping Towards A Cure. Our Relay camp last year was decked out with palm trees, flamingos, hoola girls, and of course we all wore flip flops!
     This year the theme for the ENTIRE Relay is TropiCURE Paradise....ummmm can you say FLIP FLOPS required?!?!?!
     I had run across the most adorable idea on Pinterest (another one of my obsessions). It was for a flip flop wreath. I knew that I HAD to make one for myself, but I also knew I had to make one for the silent auction at our Relay. It would fit in perfectly with the theme!!
     Last year at the end of Summer, I bought several pairs of children's flip flops when they were on a closeout end of season clearance. I think I paid maybe .50 or .25 cents a pair. I tucked them away knowing I was going to make this wreath.
     Soooooo I recently got the crafting spirit and pulled out my flip flops to get craftin'!

What you will need:
6-8 pairs of flip flops (depending on sizes you may need more or less)
Hot Glue Gun
Ribbon
First you want to separate your flip flops out. You want to use either all lefties or all righties for your wreath. You can essentially make two wreaths (which is what I did, I did a all lefts wreath and another with all of the right side shoes).
Next you want to lay out the flippey flops. Decide which colors and patterns you want beside each other. I ended up with several different sizes of shoes, so that was also a factor for me. I had to decide which sizes made the best shape.
Now you need to get your hot glue gun all heated up......
Next pick up a toe or heel of a flip flop and hot glue it down. Continue to glue your way around the wreath until all of the toes and heels have been glued together.
Lastly, tie some cute ribbon on and make a bow. I just made a double bow. I also made a loop on the back for a hanger. I put it up on my door for a cute summer decoration. The other wreath will be donated for our Relay for Life Event.

That's my simple summer flip flop craft!! Enjoy!

-Jessica

Thursday, March 15, 2012

Lost Sock Board.......I was feeling crafty


    I have recently been having some renovations in my house. My heater died and a new one had to be put in. Long story short.......the entrance to my attic is in my laundry room. I felt I needed to really clear the clutter in the laundry room so that the workers didn't get things dirty. Well I found a jillion socks that didn't have partners while I was de-cluttering. Possibly a jillion is a slight exaggeration.........
     I did decide to make a lost sock sign. I had seen a couple of different ideas on Pinterest, but not exactly what I wanted. So I decided to design my own. Here is what I came up with......

What you need:
-Wooden Craft Plaque
- picture hanging kit (with wire and eye hooks)
-picture hanging kit or other type of hangers for the back
- Ribbon
- Adhesive letters
-Paint and brush
- Clothespins

Lay down some newspaper and paint your wooden plaque. Be sure to paint all of the sides, front, and the back. I painted mine brown and did a darker brown around the edges to break up the color.

It is sort of hard to tell in this picture because the paint is still wet, but the edges are a slightly darker brown than the front. I let the paint dry overnight and then finished everything else the next day.
I first determined where I wanted my eye hooks and wire to be. I put the eye hooks in first. I used a ruler to be sure that they were level and then installed them both. Next I strung the wire from one hook to the other.
Next I placed my adhesive letters. I had purchased these previously for another project, so I just used the letters that I had. I placed mine at a slant.
I then installed the picture hangers on the back of the plaque.
I made the bow/hanger last. I looped the ribbon through the picture hangers on the back, brought it back around and tied a double bow. I thought it looked cute with the extra ribbon hanging down so I didn't trim it off, you could if you wanted.
Right now I have full sized clothespins on the board. I'm hoping to find some smaller ones at a craft store and then I will paint them colors that match the polka dots in the ribbon. But for now, I just have the large ones.


    This project was super easy and it puts my socks without partners up there for me to see instead of having to hunt and hunt for them. I think I will be much more likely to find their mates now that they are front and center.
     I hope you enjoyed seeing my fun project!!

-Jessica

Sunday, March 11, 2012

Green Velvet Cuppeycakes......... embrace your inner Irish spirit!!


     A couple of weeks ago I had run across a recipe for green velvet cake on Pinterest. Of course it was not gluten free. I pinned it, and decided that I needed to revamp that recipe and turn it gluten free. I thought it would be a really fun recipe to celebrate St. Patrick's Day with. So embrace your inner Irish spirit and get to baking.......these cuppeycakes are yummy!! Oh, and they also turn your tounge green! ha

Green Velvet Cupcakes

2 1/2 cups Gluten Free Flour Mix
3/4 teaspoon Xanthan Gum
2 cups sugar
1 Tablespoon cocoa
1/2 teaspoon salt
1 teaspoon baking soda
2 eggs
1 cup oil
1 cup buttermilk
1 Tablespoon vinegar
1 teaspoon vanilla
1 oz green food coloring

Pre-heat the oven to 350 degrees. Place the muffin liners into the muffin tin. Spray the inside of the paper liner with cooking spray. Set aside.

Combine all of the wet ingredients (except the food coloring). Mix on a low speed with an electric mixer. Add in the dry ingredients and mix well until combined. Add in the entire 1oz bottle of food coloring (yes the ENTIRE bottle). Mix on a very low speed or by hand. You won't want the food coloring to splash out of the bowl.

Fill the muffin liners with batter (about 3/4 full). Bake at 350 deg. for 18-20 minutes. Allow the cupcakes to cool and then frost with your favorite frosting.

Combine all of the wet ingredients, then add in the dry ingredients.
This is the "before" picture....just looks like a chocolate cake batter.
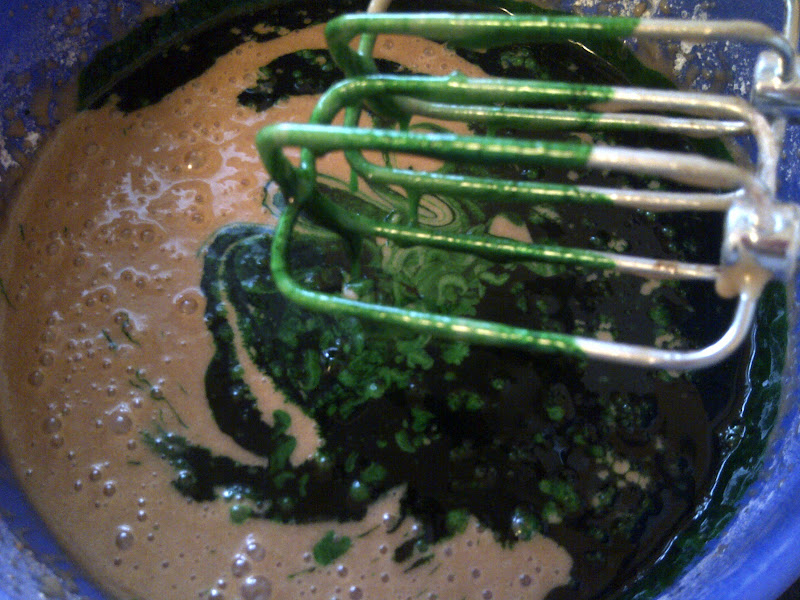
Time to add the green food coloring. It seems like ALOT, but I guess that's why they are called "green velvet".

In goes the green...............ALL OF IT!!
You will want to mix the food coloring in by hand or using the lowest speed on your mixer. Otherwise you may end up with a green speckled wall or counter top!!

Mix until the batter turns an amazing green color and all of the food coloring is incorporated in.
When the cuppeycakes are finished baking, cool them on a cooling rack.
Once they are cool, frost with your favorite frosting. I totally cheated and used a canned frosting! (shhhh)


These cupcakes were fun to make and quite yummy. I hope you enjoy them!! Happy St. Patricks Day! (a little early).

-Jessica

Friday, March 9, 2012

Frontier Soup's Chicken and Noodle Review


     Some of you may be wondering why I haven't blogged any yummy recipes this week. This week my house has been undergoing a little construction/renovation project. My heater died and had to be replaced. I know that doesn't sound like a huge deal, but my old heating beast was a floor heater (giant antique, grate in the floor, old beast). The new heater is a forced air unit. Holes had to be sawed in my ceilings. The old unit had to be removed, floor filled in, and repaired. There were men everywhere, dust flying, insulation, sawdust, and all sorts of grossness going on. It was not exactly the environment that I enjoy cooking in....so I didn't.
     On the first day of the project one of the workers knocked on my door bright and early at 7:15 to get started. I let him and and ask him how he was, his reply, " well not too good, I threw up before I came." Ummmmmm super!! That was SO what I wanted to hear (insert lots and lots of sarcasm). He worked in my house for 2 days touching all sorts of door handles, leaving germs and such. Needless to say yesterday my muscles were hurting and I was exhausted. I chalked it up to stress from the project and all the cleaning to get the house back into shape after they left. This morning I woke up more sore than yesterday and with other lovely symptoms (see the symptoms the worker guy had).
     There would be no cooking taking place today either since I felt like crud. However, I remembered that I had a little packet of chicken and noodle soup in the kitchen from Frontier Soups . I thought that this would be the perfect opportunity to try out their soup mix and share a review with you. Chicken and Noodle soup is supposed to be the healer of all things.
     In order to make the soup you needed the soup packet, 6 cups of broth, 2 T. of butter, and a chicken breast. I didn't have any chicken breast un-thawed so I just used a can of chunk chicken (like tuna, but it's chicken). I also added a can of carrots, 1/2 C. Minute Rice, and 1/3C. Celery. I'm not a big fan of soupy soups. I'm more of a chunky soup person. So I added the extra veggies. Plus, more veggies equals more healing vitamins!!
     The soup was very easy to make. I think that using the canned chicken made it even easier. The only utensils I needed was my can opener, a spoon, and scissors to open the soup packets.
     I love that the soup mix didn't require many extra ingredients to purchase. I really hate to spend money on a mix only to find out that you have to buy 10 other ingredients to put WITH the mix. This soup didn't require that. I also love that it was a "quick fix". I wasn't feeling much like standing in the kitchen for a long period of time to make the soup and it didn't require me to. It took maybe 30 minutes to cook. It would have taken a little longer if I had used fresh chicken breast.
     The soup smelled very good while it was cooking. Like I said before I'm not much for a soupy soup, so I served my soup over some mashed potatoes. It tasted very good.
     I would definitely buy this mix again. It was so nice to have a simple quick meal to fix.

Thursday, March 1, 2012

Sinful Peanut Butter Pie Bars

    
Did you hear that today is a national holiday? It is Peanut Butter Lovers Day!! If you said no, then you weren't the only person in the world who didn't know. I wasn't aware of this amazing holiday until this morning.
     I am a huge fan of peanut butter so I thought it was only fitting that I celebrated by making something peanut buttery. I hope you enjoy my creation.

Sinful Peanut Butter Pie Bars

1 C. Creamy Peanut Butter
1 pkg. (8oz) Cream Cheese
1 C. Powdered Sugar
1 tsp Vanilla
1 (14oz) can Sweetened Condensed Milk
1 (8oz) container of whipped topping

1 1/2 C. Crushed gluten free cookie or cereal crumbs
6 T. Butter or Margarine, melted
1/3 C. Sugar

To make the crust, combine the crushed cookies, margarine, and sugar. Mix well. Smoosh into a pie plate or a 9x9 or 7x11 baking dish. Bake at 375 deg. for 15 minutes. Allow to cool before filling. While the crust cools, prepare the peanut butter filling.  (you wouldn't HAVE to bake the crust, I just like it better baked a little)

In a bowl combine the peanut butter and cream cheese with an electric mixer. Add in powdered sugar and mix until combined. Add sweetened condensed milk and vanilla and mix until light and fluffy. Using a spatula fold the whipped topping into the peanut butter mixture. Fold until combined but be careful not to loose the fluffyness of the whipped topping.

Spread the peanut butter topping over the crust. Garnish with chocolate shavings if you wish.  Cut and serve. Store any leftovers in the refrigerator.
I didn't have enough cookies, so I used some peanut butter and chocolate cereal as well for the crust.
Oh I'm so sorry bunnies.......you are going to a good cause though.

Combine the crust ingredients and smoosh into a pan.
While the crust is cooling, prepare the filling.
Mix the cream cheese and Peanut Butter, followed by the powdered sugar.

Next add the sweetened condensed milk and vanilla.
Fold the whipped topping into the creamy peanut butter mixture.
Spread the creamy filling over the cooled crust.
Garnish with some chocolate shavings to make it look pretty.
Cut into squares and serve.
These can also be made in small glass cups or mini mason jars.


     I hope you enjoyed my recipe to celebrate Peanut Butter Lovers Day. This dessert is so yummy, but is also SO rich, so be sure to share with your loved ones. Happy Peanut Butter Lovers Day to you and yours! ha

-Jessica


Friday, February 24, 2012

Cauliflower Pizza Crust.........trust me it's NOT gross!


     I ran across this recipe on Pinterest for Cauliflower Crust Pizza....it had about a zillion pins. I decided that at some point in time I would give this recipe a try. It sounded weird, but it was quite popular with the pinning crowd. I had my reservations about it. Cauliflower is a veggie that I like (with cheese). I figured that trying it once would not kill me....hopefully.
     The hardest part of the recipe is ricing the cauliflower. It isn't that it is hard, it just a little messy. However, my one head of cauliflower made a cookie sheet sized pizza, a mini pizza, and enough for another recipe that size that I put into the freezer (2 cups of riced cooked cauliflower). So at least you only have to make the mess once in a while.
     I was very surprised that the cauliflower isn't really able to be detected in the finished product. I figured it would have a bizzaro flavor, but it didn't! It tasted good. Did I just say that? A veggie crust tasted good?!?! My Mom happened to stop by while I was cooking and she tried it when it came out of the oven. She was also shocked. She thought it was really good as well. She kept saying "there is cauliflower in here?" ha Yep, Mom in the crust!!
     The texture of the crust wasn't quite stiff enough to pick up, however it was very close. On the mini pizza I could pick up the slices. On the bigger rectangle pizza I didn't chance dropping toppings all over. I liked the texture though.
     I made a few changes to the original recipe. You know me, I never seem to leave recipes alone. It just doesn't seem possible for me to follow a recipe without making it my own. Adding and subtracting things to get MY version. Without further adieu..............

Cauliflower Pizza Crust
1 cup cooked, riced cauliflower
3/4 cup shredded mozzarella cheese
1/3 cup parmasean cheese, grated
1 egg, beaten
2 tsp Italian seasoning mix
1/2 tsp garlic powder
3 large cloves garlic, minced

Pizza toppings: veggies, cheese, pepperoni, meat etc.
To rice the cauliflower: Wash and dry one large head of fresh cauliflower. Remove leaves and stems. Chop into chunks. Place the chunks into a food processor or heavy duty blender (you may want to do several small batches instead of the whole head at once). Pulse on high until the cauliflower resembles a grain. Don't go too long or it will turn to mush and we don't want mush. (Ricing may also be done by using a cheese grater, grate the head of cauliflower if you don't own a food processor or blender). Place the cauliflower into a microwave safe bowl and cook for 8 minutes. You do not need to add any liquid.

One large head of fresh cauliflower should be 3-4 cups of riced cauliflower . The recipe calls for 1 cup,  however I doubled my recipe to make a pizza on a cookie sheet. The remainder may be saved for another time. I packaged mine and put it into the freezer.

The Crust:
Pre heat the oven to 450 deg. and spray a cookie sheet or pizza pan with cooking spray.

In a medium size bowl. Combine the egg, spices, and cheeses. Add in the cauliflower and mix until well combined.

Using a spatula spread the mixture out in a thin layer on the greased cookie sheet. You want a thin, even, layer of crust mixture. Be sure that there aren't any holes.

Bake at 450 deg. for 15 min. Remove from the oven and top with your favorite toppings.

Increase the heat on the oven to broil and place the topped pizza back into the oven for 8-10 min. or until the cheese is melty and slightly browned.

I never would have guessed that cauliflower makes a good pizza crust!
To rice the cauliflower I used my blender. I did several small batches.

You want to have a grain like consistency, not a mush.
Here is a snazzy little video clip of me ricing some cauliflower......get excited!
Once you have the cauliflower ready, you just need to mix up the other ingredients.

Beat the egg, then add the spices and cheeses. Then the cauliflower goes in.
On a greased cookie sheet, spread the mixture into a thin even layer.

Bake at 450 deg. for 15 minutes

Abstract mini pizza crust.
I put the leftover riced cooked cauliflower into a freezer bag and into the freezer.

Remove the crust from the oven and add your favorite sauce and toppings.


This recipe turned out much better than I had ever anticipated. I hope that you love it as much as I did. It is low-carb and gluten free and yummy! Enjoy!!!
-Jessica