Sunday, December 11, 2011

Pizza Monkey Bread


      I recently saw a recipe for gluten free Monkey Bread. It excited me, but it wasn't so exciting that I immediately ran to the kitchen to whip some up. To be honest I have never had monkey bread, gluten free or not. However it looks amazingly yummy. Skip to a few days later, I saw a recipe for a garlic pull apart bread. Sparks flew, party horns sounded, and I had a genius idea to combine the two recipes to create my own amazingness! Thus, the birth of Pizza Monkey Bread!!


Pizza Monkey Bread

9 egg whites
3 tablespoon oil
3/4 cup milk
1 1/2 cups gluten free flour
2 Tablespoons baking powder
1 1/2 teaspoons baking soda
2 tablespoons sugar
1/2 teaspoon salt
2 teaspoons xanthan gum
3 tablespoon apple cider vinegar
1 Tablespoon Italian Seasoning
2 Tablespoons Parmesan Cheese

Assembly Ingredients:
Pepperoni (torn or diced into smaller pieces)
Mozzarella Cheese
Parmesan
1/4 C Margarine or butter
1 T. Italian Seasoning
1/2 tsp. garlic powder

Preheat oven to 350o F and generously grease a bunt pan.
 Beat the egg whites until frothy. Add the remaining dough ingredients and stir until quite thick. (This will take a while). Set aside.
Prepare the "assembly ingredients" Melt the margarine, add in spices.
 Drop rounded tablespoons of the dough in the bunt pan. Sprinkle pepperoni, Parmesan, and mozzarella. Brush layer with herbed butter/margarine and keep layering until the dough and filling are gone.
 Bake for 30-35 minutes until bread is lightly browned and a toothpick comes out clean. Let cool, then invert onto a serving plate. Serve with warm pizza sauce or leftover herbed butter for dipping.
Separate your eggs, (note to self: Find a good recipe that uses 9 egg yolks)
Beat your egg whites until they are very frothy, borderline stiff.
Combine the egg whites with the remaining batter ingredients and beat until thick. This will take a while.
Drop the dough by spoon fulls into the bottom of the pan.
On the layer of dough sprinkle pepperoni pieces, cheeses, and brush with herbed butter.
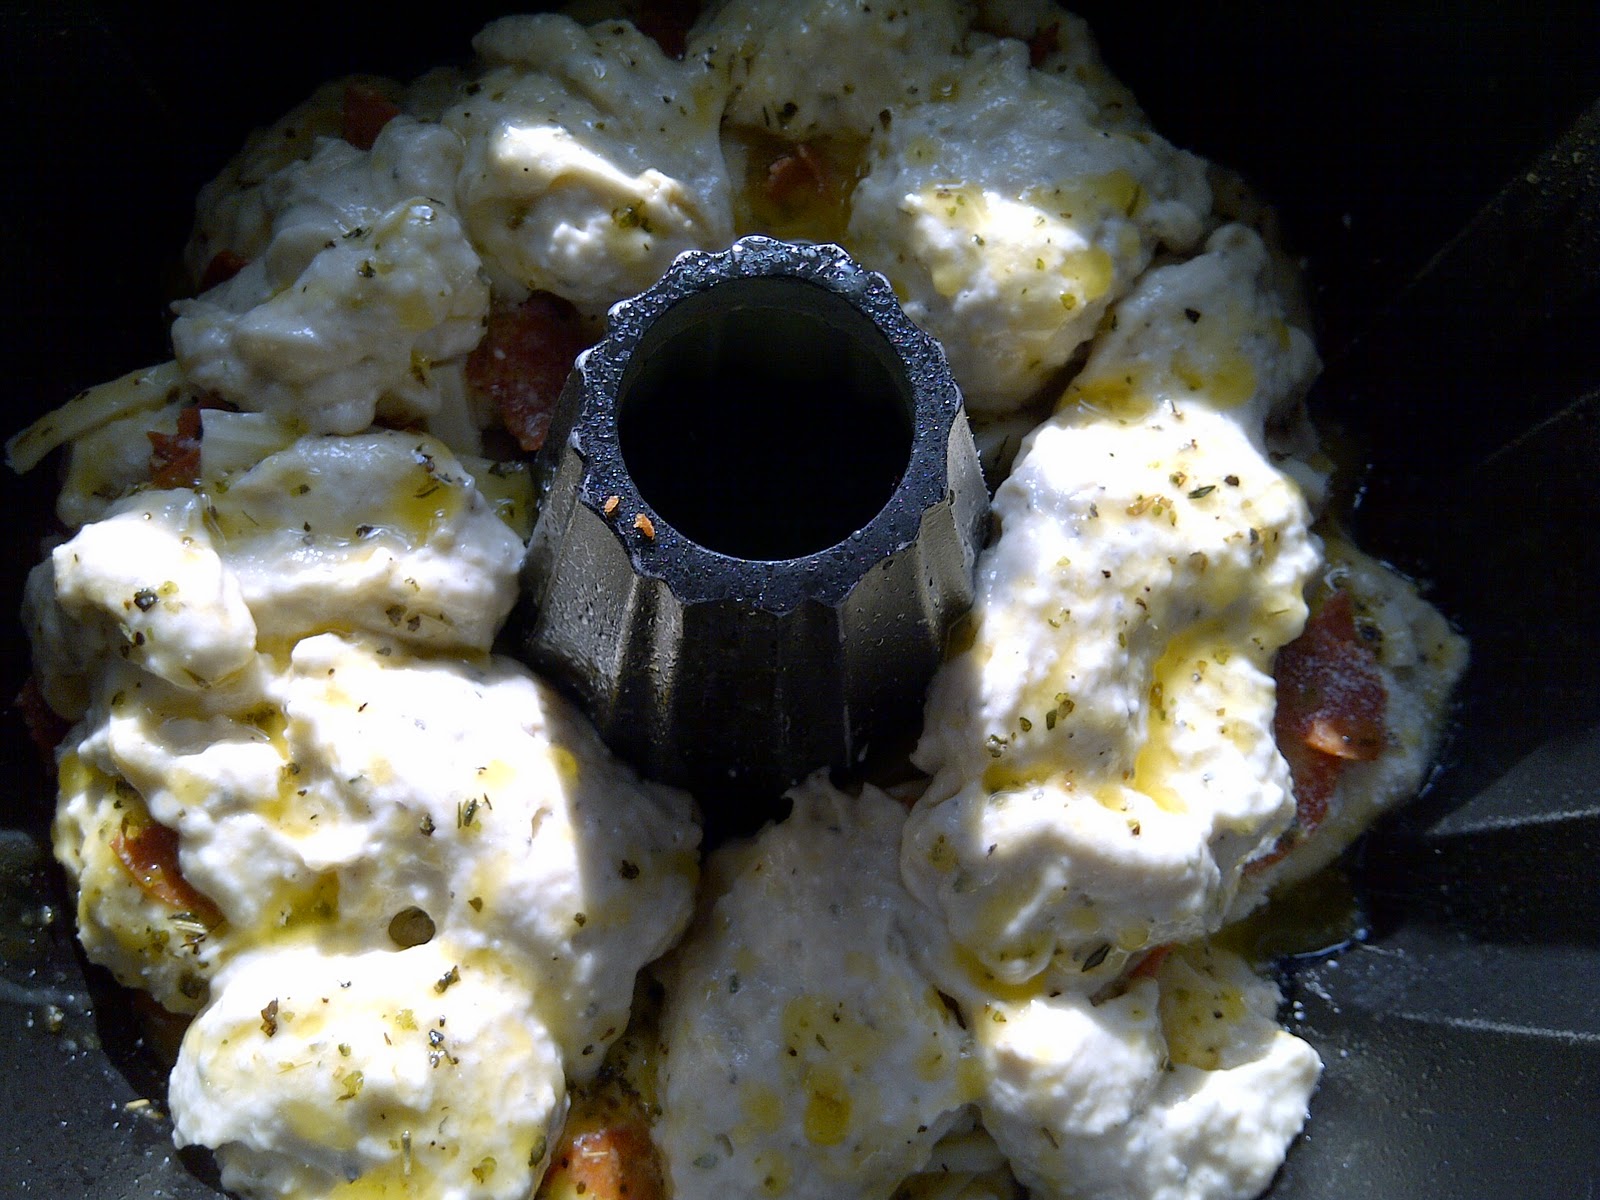
Layer more dough and more topings until you are out of dough to layer.
Bake at 350 deg. for about 35 min.


Enjoy!!!

-Jessica


Wednesday, December 7, 2011

Milk Chocolate English Toffee.....drool!


    Pinterest is evil........they show you yummy pictures of foods and then I just HAVE to try making the recipe. I'm not sure if this one had me by the picture or the tag line " This is the best toffee ever. It is a vintage recipe that my husband's Grandma Utahna used to make. I have made up to 24 batches at Christmastime." OK SOLD!! I pinned the recipe and have made myself wait until December to make it. Well here it is the 7th of December........close enough to Christmas. I made toffee today!! Seeing as I am not really a candy maker, I followed the recipe step by step. The original recipe came from Pinterest, and the pin came from a blog called Red Couch Recipes. OK, well I take that back, I didn't have any nuts, and the original recipe called for nuts, so I left those out. I guess I just can't follow a recipe to the T, it isn't in my genes!!

Milk Chocolate English Toffee (from Red Couch Recipes)

1 cup butter
1 cup granulated sugar
3 tablespoons water
1 cup toasted pecans broken in pieces--Toast in 350 degree oven for about 10 minutes.
Milk chocolate chips

     Place toasted pecans in the bottom of 8 x8 pyrex pan. Put butter, sugar, and water in medium heavy sauce pan and cook at high temperature. I always break up my butter in small pieces in the sauce pan. Stir with wooden spoon throughout the cooking time. The mix should always appear fluffy at all times. Cook until mixture turns an amber color, starts to leave the sides of the pan, and is slightly smoking, take off heat and turn immediately over onto prepared nuts. The cooking time is relatively short, depending on your stove, approximately 7 to 8 minutes with a gas stove and 10-11 minutes with an electric stove. These are just approximate times. Let toffee cool for 8 to 10 minutes. Then sprinkle with milk chocolate chips. When chips are melted, swirl around with knife. Let chocolate dry -- this takes several hours. When chocolate is dry, turn over toffee on wax paper and break into pieces.

Candy Making Notes:
While stirring, use a wet pastry brush or clean, wet dishcloth to wash down the sides of the pan to dissolve any undissolved sugar crystals. If you skip this step, the candy might sugar. Also when you pour the toffee mixture on the pecans, do NOT scrape the pan. If you do scrape the pan, this could also cause the mixture to sugar. If you are making more than one batch, make sure that your pan and spoon are clean of sugar crystals. If it DOES sugar, it tastes wonderful broken up and served on a good quality vanilla ice cream. Also, make sure that your toffee is truly an amber color before you take it off the stove.
________________________________________________________________________________
     Ok, that's the exact recipe from Red Couch, I left out the nuts because I didn't have any on hand. I think that I didn't cook my toffee quite long enough because it sugared on me. UGH! I cooked it longer than her recipe said to cook it, but I think it could have went a little longer. So next time I will cook it longer. It still tastes amazing.......just isn't quite the right texture.
Butter, sugar and water in the pan
Melting and mixing with my wooden spoon.
Fluffy and bubbly toffee
Pour the hot mixture into a well greased pan.
YUM!
Sprinkle Chocolate Chips on top of the warm toffee.
When the chips get melty, spread them over the toffee and let the chocolate dry.
When the chocolate is dry, turn the toffee out onto some wax paper.
Use a knife and break it into pieces.


Sometimes I love the Fed-ex man...........

     The Fed-ex man visited my house today. I was wracking my brain trying to think of what Christmas gift was scheduled to be delivered today....couldn't come up with any. I went outside to retrieve my box and see what in the world had come.
      I looked at the return address and it was from Udi's. They recently had a holiday prize pack giveaway. Each day they asked a question on their blog, then random people were chosen to win prize packs. Low and behold I WON!!! (keep in mind I'm usually not a person who wins anything). I was super excited to win a prize pack from them. I was even more excited when it came today!!
This is the cute box that came inside of the cardboard mailing box.

Holey cow....this box is jam packed with yummy goodies!!

1 awesome burlap Udi's bag, 1 Udi's t-shirt, package of pizza crusts, package of hamburger buns, loaf of bread, and container of snickerdoodles. WOW a gluten free treasure chest!
Thank you Udi's. You made my day with your holiday prize pack!!

-Jessica


Monday, December 5, 2011

Sometimes I like to be crafty......Crayon Art (nothing to do with gluten)


     Pinterest is my new LOVE. It is full of such fun and creative ideas, house decor inspiration, recipes, jewelery, collectibles, well pretty much everything!! I had seen several ideas for crayon art. I decided that I would have to give it a try sometime.
     Over the weekend I was able to pick up a canvas for a good price, so I thought now was a great time to give the crayon art a shot.
     The instructions were pretty simple. You choose your crayon colors, glue them to the canvas, use a hair dryer or embossing gun to melt the wax......taaa daaaa. Well my adventure went slightly wrong with the gluing on of the crayons. I was using hot glue and a crayon slipped out of my grasp and onto my fingers and burned the crud out of my poor ring finger and pinky finger. Why am I telling you this? Well because I probably won't be making many yummy fun things in the kitchen this week because my silly finger hurts. Especially since I was contemplating making decorated cookies....and I can't squeeze an icing bag very well with a bandaged up finger! So I apologize for my crafting injury.....hopefully I will be back up and cooking fun things soon.
     For now, I will show you my cool project that created my injury! ha

I started by painting my canvas a light sky blue.

I chose green crayons for my project. I used a hot glue gun to stick them to the bottom of the canvas.

Hot glue is VERY hot...do NOT get it on your skin, or your skin will look like mine. OUCH!
I covered the bottom of my canvas with the green crayons of different shades.
I don't own an embossing gun, so I just used a hair dryer on HOT to melt the wax.

Angle your canvas so that the wax will run down the canvas and create stems.


Attach flowers with hot glue and enjoy your new piece of artwork!!


I promise to be back in the kitchen blogging about my recipes in a few days. This silly burn just needs a little time to heal!!

-Jessica


The best lotion EVER!! and a little commentary on gluten in personal products.


     I made the most amazing lotion ever today. A couple of years ago one of my students gave me a jar of this lotion as a Christmas gift. It was his Grandmother's recipe. I begged and begged for the recipe. I reminded the kiddo on a regular basis to ask Grandma for the recipe......well I ended up getting just an ingredient list from my student's Grandma. It was helpful, but I have never made lotion before and I needed to know how much of this and how much of that......well I never got the top secret recipe.
     I was browsing through Pinterest the other day and SHAZAM there was a picture of the ingredients for this top secret Grandma recipe lotion. I had to of course click on the link and see if it could possibly be a recipe for this magic lotion. IT WAS!! Or at least, it had the same ingredients.....
      SOOOooooo I went to the store to pick up the goods to make this amazing lotion. I knew going into the project that finding a Vitamin E lotion may be tricky. Many Vitamin E creams seem to contain gluteny ingredients. For that matter, many lotions in general often contain gluteny ingredients. I'm not sure why anyone needs wheat on their skin. The oats are a little more understandable (I guess). They supposedly calm your skin and are moisturizing. I avoid them!! Sure enough, the first container of Vitamin E cream had "wheat germ" as an ingredient. Moving along.......I moved towards brands I was more familiar with, companies I had called before and finally found one. I then picked up the other ingredients, of course checking to be sure I had picked up gluten free brands in those as well.
     Some of you may be saying....what in the world does it matter if your skin care items are gluten free. Well here is how I look at it. I know that sometimes in the shower I get shampoo in my mouth on accident. If my shampoo had gluten, then I just accidentally glutened myself. I also know that sometimes I put lotion on and then go eat lunch. If my lotion isn't gluten free, then I eat my food using my hands....I have most likely just glutened myself. In my opinion it is just much easier to not even have to deal with those accidental glutenings....just buy products that are safe!! Ok, back to the lotion making.....
       I came home and whipped up a batch of the amazing lotion. It was exactly like the gift lotion that my student had given me. This lotion is PERFECT for winter time. It is thick and so amazing for winter time dry skin. It also smells good!! I made some extra lotion to give as gifts this Christmas. (Shhhh, don't tell my family and friends!!)

The Best Lotion EVER!
16 oz. Baby Lotion
8 oz. Vaseline
8 oz. Vitamin E Cream

Combine all of the ingredients with an electric mixer. Mix until it resembles icing. Divide into containers.
Gather your ingredients

Pour all of the lotions into a bowl. I recommend using plastic silverware to scoop the Vaseline out of the jar.

Use an electric mixer to combine the ingredients.

Whip until lotion is the consistency of frosting.

Spoon into jars and containers for gift giving.

     I hope you enjoy the lotion recipe. Just don't tell my student's Grandma that I cracked the code and have her secret recipe now!!

-Jessica

Sunday, December 4, 2011

Bacon Pancakes


     While looking through Pinterest ideas the other day, I ran across this fun idea to do with pancakes. I had that Kinnikinnick pancake mix that I needed to try out so I thought this would be a great way to try it. It is super easy and it was quite yummy!!

Bacon Pancakes

Your favorite pancake mix (prepared according to the recipe or box) I used Kinnikinnick
6-8 Strips of cooked bacon
Favorite toppings (syrup, butter, whipped cream, fruit)

Mix your favorite pancake mix according to the box

Lay out a couple pieces of your cooked bacon.

Cover the bacon strips with pancake batter.

Flip your pancakes when they are golden brown.

I also made a few pancakes where I tore the strip of bacon into pieces and poured the batter over those. It made circle shaped cakes instead of the long guys.


Serve your warm pancakes with your favorite toppings. I topped mine with an egg. Enjoy!!

-Jessica


Friday, December 2, 2011

Apple Cranberry Crisp


     The other day on the news a local nutritionist was making a Cranberry Apple Crumble. It peaked my interest. I had some cranberries in the fridge that needed to be used.....hummmmmmmm The lady on the news was making hers all healthy (she was a nutritionist after all). I wasn't wanting to go overboard with the healthyness. So I decided to use my regular old apple pie filling recipe, but add in the cranberries. Then for the topping I would use a topping that I sometimes use for crisps and crumbles. So here is what my result is:

Apple Cranberry Crisp

5-6 Apples (peeled and diced into chunks)
1 C Cranberries (washed)
1 T. Lemon Juice
1 T. Cornstarch
1 tsp. Cinnamon
1 tsp. Pie Spice
1 C. Sugar (more or less depending on the tartness of the variety of apples you chose)

Crisp Topping Ingredients:
1 C. Gluten Free Flour Mix
3/4 C. Sugar
1 tsp. Baking Powder
1/2 tsp. Cinnamon
1/2 tsp. pie spice
1/4 tsp salt
1 egg
1/3 C Butter (melted)

     Pre-heat oven to 350 deg. Spray a 8 x 8 pan with cooking spray. In the pan place apples, cranberries, spices, sugar, cornstarch, and lemon juice. Mix well coating all of the apples and cranberries.
     In a small bowl Mix the ingredients for the crisp topping. Mix flour, sugar, baking powder, spices, and salt until combined. Add egg and mix with a spoon until combined. Mixture will be crumbly.
     Sprinkle topping mixture over the apple/cranberry mixture. Pour melted butter over the topping mixture. Bake in a 350 deg. oven for 50 min. or until apples are cooked through and top is golden brown.
   Serve it warm, and with ice cream if you dare :)

Diced apples and cranberries
Combine cornstarch, sugar, spices and lemon juice
Combine to coat the apples and cranberries
Combine the Ingredients for the topping. Mix with a spoon until combined and "crumbly".
Spread the topping over the apple/cranberry mixture. Pour melted butter over the topping. Bake at 350 until golden brown (about 50 min.)
Mmmmmm!
If only I had some vanilla ice cream.......I should have planned ahead!

Well the recipe turned out very well. I liked the flavor of the tart cranberries with the apples. I would try it again! It was something different instead of the same old apple crisp or crumble. If only I had a little vanilla ice cream to go with it, that would have made it heaven!! Let me know what you think!

-Jessica