Showing posts with label kids. Show all posts

Wednesday, April 11, 2012

Chili Cheese Dog Casserole - Gluten Free Style of Course!


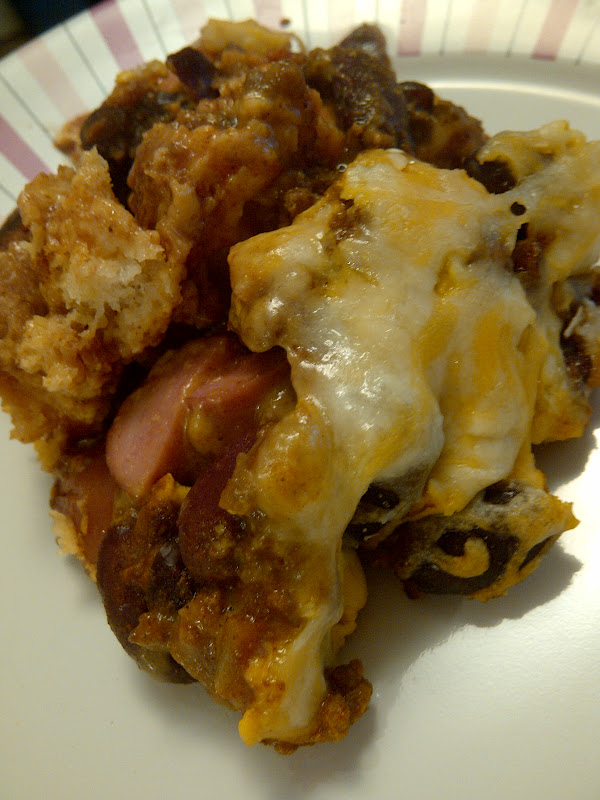
     Do you ever have those nights where you have no idea what to make for supper? Well tonight was one of those nights for me!! I also have been trying to clean out the freezer a little so I decided to use up a few things that were taking up space.....leftover frozen chili, turkey hot dogs, and some Udi's bread that was starting to get ice crystals. Do you see where I am going with this one?? That's right...I made chili cheese dog casserole!!

Chili Cheese Dog Casserole -gluten free style

8-10 Hot Dogs, cut into chunks
8-10 Pieces of gluten free bread, torn into pieces
4 C. Chili
2 T. Mustard
2 C. Cheese

Pre-heat the oven to 350 degrees. Spray a casserole dish with cooking spray. Place the torn bread in the bottom of the dish. Top with the hot dog chunks. Top with 1/2 the cheese, then the chili. Bake for 15 minutes. Remove from the oven spread the mustard over the top and the remaining cheese. Bake for another 15 min. or until heated through and cheese is melted. Serve hot.

I heated my chili first because it was frozen. If you didn't have frozen chili you could use canned (Hormel is gf, but of course read the label because as soon as I post this info is out of date ha! )

Tear the bread into pieces

Start layering: Bread, hot dogs......
1/2 of the cheese

Chili and then bake for 15 min.
Remove from the oven and top with mustard and more cheese....back into the oven for 15 min. or until heated through and cheese is melted.


For a night where I had no clue what to cook I think it turned out great. The bonus was there is even some more space in my freezer!! I hope you enjoy this recipe.

-Jessica

Tuesday, March 20, 2012

Dirt Dessert.......Happy Spring!


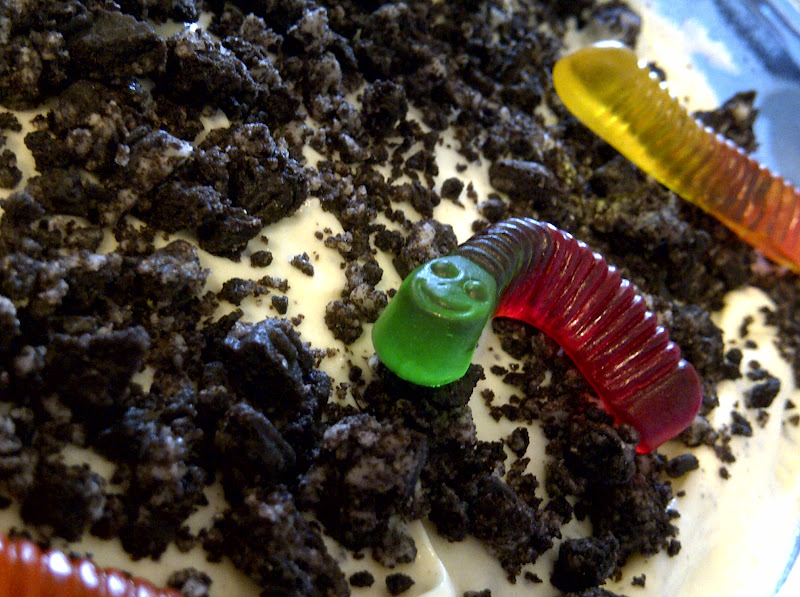
     Today is the first day of Spring!!! Spring is my favorite season. The temperatures are mild and the flowers are blooming. I LOVE it! I decided that I would make a gluten free version of Dirt Dessert to commemorate the first day of Spring!

Disclaimer: No gummy worms were harmed in the making of this blog.

Dirt Dessert - the gluten free way

1 package cream cheese (8oz), Softened
1 C. Powdered Sugar
3 1/2 C. Cold Milk
2 Packages(3.4 oz) Pudding Mix (use vanilla, chocolate, or white chocolate for best results)
1 Carton (16 oz) Whipped Topping, thawed
1 package gluten free cream filled sandwich cookies, crushed (Glutino and Kinnikinnick both make gf)
1 package gummy worms (check labels to be sure they are gf)

In a large bowl beat the cream cheese and powdered sugar until smooth, set aside. In a second large bowl combine the pudding mix and cold milk. Whisk until mixed completely. Let stand for about 2 minutes or until it is soft-set. Gradually stir the pudding mixture into the cream cheese mixture. Mix until creamy and completely combined. Mix 1/2 C. of the crushed cookies into the mixture.  Fold the whipped topping into the pudding/cream cheese/cookie mixture.

Spread approximately 1/2 C. crushed cookies on the bottom of a 9x13 in. pan. Spread the pudding mixture on top of the cookies. Top with the remaining crushed cookies. Lay gummy worms on top of the "dirt" or poke them down into the "dirt".  Refrigerate for at least 1 hour before serving.

To crush the cookies, I put them into a gallon plastic baggie and banged on them with my meat mallet :) You could also put them into a food processor
Mix the cream cheese mixture and the pudding mixture together.
Fold in the whipped topping.
Dirt dessert can also be made into individual serving cups.

I decorated with some live cut flowers to make my cups more "adult". I just took my live flowers, wrapped about an 1 1/2 in. of the bottom of the stem in plastic wrap and stuck it down into the dirt.


Happy Spring!!!!

I hope you enjoy this fun recipe.

-Jessica

Wednesday, February 8, 2012

Valentine Fortune Cookies (crafty not edible)


     I decided that I was NOT going to spent $3.50 on a greeting card for each member of my family this year. They always look them over, chuckle, and few days later the cards go into the trash. I hate seeing all of that money go to waste like that. SO this year I am making my own Valentines.
    I saw a cute idea on Pinterest to make paper fortune cookie party favors for New Years. I decided this would be a super cute idea for Valentines Day. The fortune would have a sweet message for my loved one. Or in my case....funny messages because I'm more of a funny card person than a serious card person.
       These fortune cookies would also be cool for a birthday, wedding shower, or graduation card(you could tuck some money inside with a cool saying about their future). The possibilities are endless for these guys!!
      I also thought that they kind of fit in with my gluten free world as well. Those silly little fortune cookies that you get at Chinese restaurants are filled with gluten. So even if you are lucky enough to find a Chinese restaurant with a gluten free menu, you don't get to eat your fortune cookie. To a child, this may be a HUGE deal. So it might be fun to make up a few of these and when you are going out to that gluten free Chinese restaurant, bring one along so that the child (or child at heart) still gets to have a fortune.
     The blogger that originally made these has an awesome tutorial, with great pictures on how to make them. You can find her Lucky You Party Favors here.
     I made my fortune cookies extra big. I figured if they were supposed to be greeting cards, I didn't want them small like real fortune cookies. I thought they needed a WOW factor :) Ok, so let's make some fortune cookies!!!
I found a package of scrap booking paper at the store for 97cents. It had 7 different sheets of Valentine paper in the pack.
I used a saucer to make my circles. My circles were about 6 1/2 inches across. You could use whatever you wish to make your circles. OR if you are feeling lucky you could freehand draw them, but I don't recommend that. One circle per fortune cookie. I recommend tracing the circle on the back side of your cool paper, so that it doesn't make any marks on the printed side.
Cut out your circles. Each scrap booking page can make more than one circle (but that also depends on the size of fortune cookies you make)
Put a dot of glue on the edge of the circle and fold it over (but don't crease it).
You want to place your fortune inside of the cookie and bring the two ends together to form the cookie. You will want to place a little glue to hold the two ends together. 
Taaaaa-Daaaaaa you have a cute fortune cookie.


     Ok, so let's talk fortunes really quickly. In my opinion the fortunes were the hardest part!! I wanted something funny and Valentine related. So I just did endless google searches for funny fortunes, funny valentine quotes, funny love quotes etc. You can also do a search for fortune cookie sayings. You could put in your favorite quotes as well.
     I cut strips of my leftover scrap book paper and hand wrote my fortunes in pretty pink marker. You could make them in a word document on your computer and print them out. I chose a more handmade approach. Here is a little sampling of the fortunes inside of my Valentine Fortune Cookies.....

I love you more than bacon!!
Marriage is being able to annoy one special person for the rest of your life.
Don't be afraid of how awesome you are!
I love you like a fat kid loves cake.

     I hope that you have fun making the Valentine Fortune Cookies. I know that I enjoyed making them for my loved ones.

-Jessica

Friday, February 3, 2012

Pigs in a Poncho


    I searched and searched for an image of a pig in a poncho to put on the blog but I had no luck. I thought it would be pretty funny.......but I guess nobody else has attempted to dress a pig in a poncho. I thought I could find EVERYTHING on the Internet. I guess you guys will just have to settle for no images of funny pigs in ponchos.
     This recipe is like pigs in a blanket meets their friend the taquito. I suppose that calling it a recipe is kind of a stretch.....because it really isn't hard to make at all. This would be a great recipe for the kids to make for dinner. I'm just a big kid at heart and I liked it.

Pigs in a Poncho

1 package gluten free hot dogs
white corn tortillas (warmed)
sliced cheese
toothpicks

Pre-heat the oven to 400 deg. Place the corn tortillas on a microwave safe plate. Microwave for 25-30 seconds. Microwaving the tortillas makes them easier to work with. They will bend without breaking as easily if they are warm.

Take one corn tortilla, place 1/2 of a slice of cheese on the tortilla, place the hot dog on the cheese and roll the tortilla. Secure the end with a toothpick. Place on the baking sheet. Repeat with the rest of the package of hot dogs. Once you have all of your pigs in their ponchos place them into a 400 deg. oven for approximately 15 min. or until the ponchos have turned a golden brown.

Serve with your favorite dippers: Ketchup, mustard, salsa etc.

Crunchy poncho with melty cheese....mmmmm
Even the ketchup and mustard are happy to be near these pigs in ponchos

I hope you enjoy this fun easy treat.

-Jessica

Wednesday, January 25, 2012

Chicken Patties / Chicken Nuggets


    Sometimes I just crave "kid food". Chicken nuggets!! I usually make the adult form of a chicken nugget, which is of course a chicken patty. However, this recipe can easily be made into nuggets, trust me, I have done it before!! You just shape the patties much smaller and they turn into nuggets. The bonus is, you know what is going into the food. It is 100% chicken.
     I looooove this chicken patty on a toasted Udi's bun, lots of honey mustard and a little bit of lettuce. Add a side of extra crunch tater tots and I am in heaven! So yummy!

Chicken Nuggets/ Chicken Patties

1 lb. Ground Chicken
Large handful of Ridged Potato Chips, crushed
1/2 tsp. Black Pepper
1/2 tsp. Paprika
1/2 C. Bob's Red Mill All Purpose GF Flour
4 T. Cooking Oil

In a pie plate or on a paper plate mix the crushed potato chips, black pepper, paprika, and gf flour. Shape the ground chicken into patties (1 lb. should make 4-5 patties). Place the patty into the flour/potato chip mixture and coat the patty. Flip it over and coat the other side. When all the patties are coated with the mixture, place them into a skillet with the cooking oil heated to a medium high heat. Cook the patties until the outsides are a golden brown and the inside is no longer pink. Serve with your favorite dipping sauce or serve on a gluten free bun.
Crunch your gf potato chips into tiny chunks. The easiest way to do that is to put them into a plastic baggie and smoosh them. (Great job to assign the kiddos)
Combine your smooshed chips, gf flour, pepper and paprika.
Shape your 1 lb. ground chicken into patties or nuggets.
Press the chicken patty into the flour. Flip and coat the other side as well.
Place the chicken patties or nuggets into the hot cooking oil.
Be sure that each side is a golden brown and that the inside is no longer pink.
Remove the chicken patties from the hot oil and let them drain on a plate lined with paper towels.


Enjoy the "kid food"!!

-Jessica