Wednesday, February 8, 2012

Chocolate Covered Cherry Cuppeycakes


         This is another Pinterest inspired idea. I had run across an idea that used brownies on the bottom and strawberry cake mix on the top. However both were gluten filled and used mixes. I decided to make them from scratch using a cake recipe that makes "Cupcakes for Two". I made one Vanilla recipe, but flavored it up with some Cherry flavoring to create the Cherry portion. I then made one Chocolate recipe to create the chocolate portion. I then layered them together to create my Chocolate Covered Cherry Cuppeycakes!!
     The great thing about these recipes are that they make just a few cupcakes, you aren't stuck with two dozen cupcakes to find homes and bellies for. Not that anybody is ever "stuck" with a cupcake, but sometimes it is nice to just make a couple instead of a whole batch. If you make JUST the vanilla or JUST the chocolate recipe it will make 2 or 3 cuppeycakes. If you are combining them like I have done for this creation, then you will end up with about 6 cuppeycakes. PERFECT for those special valentines in your life on Valentines Day!
       Let's get cookin'!

Vanilla Cupcakes for Two -Gluten Free

1 egg white
2 tablespoons sugar
2 tablespoons butter, melted
1 teaspoon vanilla
1/4 cup gluten free flour mixture
1/8 teaspoon xanthan gum
1/4 heaping teaspoon of baking powder
pinch of salt
1 1/2 tablespoons milk

Pre heat oven to 350 deg. Line a muffin pan with  2 liners, spray the inside of the liners with cooking spray.

In a microwave safe bowl, melt the butter. Add in sugar and egg white. Stir until combined. Add flour, xanthan gum, baking powder and salt. Mix until smooth and creamy. Stir in the milk and vanilla extract. Mix until combined. Divide the batter into the cupcake liners.

Bake at 350 deg. for 10-14 min. or until a toothpick inserted into the center of a cupcake comes out clean.  Let the cupcakes cool completely and frost as desired.

For Chocolate Cupcakes: add 4 teaspoons of Cocoa Powder
For Cherry Cupcakes: decrease vanilla extract to 3/4 teaspoon and add 1/2 teaspoon cherry extract and a dash of pink food coloring (optional)

Ok, you have the basic recipe for the cupcakes. and also the instructions on how to make the chocolate batter and the cherry batter. You will need one recipe of chocolate batter and one recipe of cherry batter to make the chocolate covered cherry cuppeycakes. Here we go!!


I think it's easiest if you just have everything out and ready to dump into the bowl.
I just sat two bowls beside each other, when I added the ingredient for one recipe, I also added it to the second bowl. It saved time to do it that way.
Ok....ready to fill the muffin cups.
The chocolate cake batter goes in first.
Cherry Batter goes on top of the chocolate. And into the 350 deg. oven for 10-14 min.
Waiting for frosting......I used some prepared in the can chocolate frosting (just remember to check your brands to be sure it's gluten free).


Happy Valentines to you and your loved ones. I hope they enjoy these sweet treats!!

-Jessica


Valentine Fortune Cookies (crafty not edible)


     I decided that I was NOT going to spent $3.50 on a greeting card for each member of my family this year. They always look them over, chuckle, and few days later the cards go into the trash. I hate seeing all of that money go to waste like that. SO this year I am making my own Valentines.
    I saw a cute idea on Pinterest to make paper fortune cookie party favors for New Years. I decided this would be a super cute idea for Valentines Day. The fortune would have a sweet message for my loved one. Or in my case....funny messages because I'm more of a funny card person than a serious card person.
       These fortune cookies would also be cool for a birthday, wedding shower, or graduation card(you could tuck some money inside with a cool saying about their future). The possibilities are endless for these guys!!
      I also thought that they kind of fit in with my gluten free world as well. Those silly little fortune cookies that you get at Chinese restaurants are filled with gluten. So even if you are lucky enough to find a Chinese restaurant with a gluten free menu, you don't get to eat your fortune cookie. To a child, this may be a HUGE deal. So it might be fun to make up a few of these and when you are going out to that gluten free Chinese restaurant, bring one along so that the child (or child at heart) still gets to have a fortune.
     The blogger that originally made these has an awesome tutorial, with great pictures on how to make them. You can find her Lucky You Party Favors here.
     I made my fortune cookies extra big. I figured if they were supposed to be greeting cards, I didn't want them small like real fortune cookies. I thought they needed a WOW factor :) Ok, so let's make some fortune cookies!!!
I found a package of scrap booking paper at the store for 97cents. It had 7 different sheets of Valentine paper in the pack.
I used a saucer to make my circles. My circles were about 6 1/2 inches across. You could use whatever you wish to make your circles. OR if you are feeling lucky you could freehand draw them, but I don't recommend that. One circle per fortune cookie. I recommend tracing the circle on the back side of your cool paper, so that it doesn't make any marks on the printed side.
Cut out your circles. Each scrap booking page can make more than one circle (but that also depends on the size of fortune cookies you make)
Put a dot of glue on the edge of the circle and fold it over (but don't crease it).
You want to place your fortune inside of the cookie and bring the two ends together to form the cookie. You will want to place a little glue to hold the two ends together. 
Taaaaa-Daaaaaa you have a cute fortune cookie.


     Ok, so let's talk fortunes really quickly. In my opinion the fortunes were the hardest part!! I wanted something funny and Valentine related. So I just did endless google searches for funny fortunes, funny valentine quotes, funny love quotes etc. You can also do a search for fortune cookie sayings. You could put in your favorite quotes as well.
     I cut strips of my leftover scrap book paper and hand wrote my fortunes in pretty pink marker. You could make them in a word document on your computer and print them out. I chose a more handmade approach. Here is a little sampling of the fortunes inside of my Valentine Fortune Cookies.....

I love you more than bacon!!
Marriage is being able to annoy one special person for the rest of your life.
Don't be afraid of how awesome you are!
I love you like a fat kid loves cake.

     I hope that you have fun making the Valentine Fortune Cookies. I know that I enjoyed making them for my loved ones.

-Jessica

Friday, February 3, 2012

Oven Fried Bacon


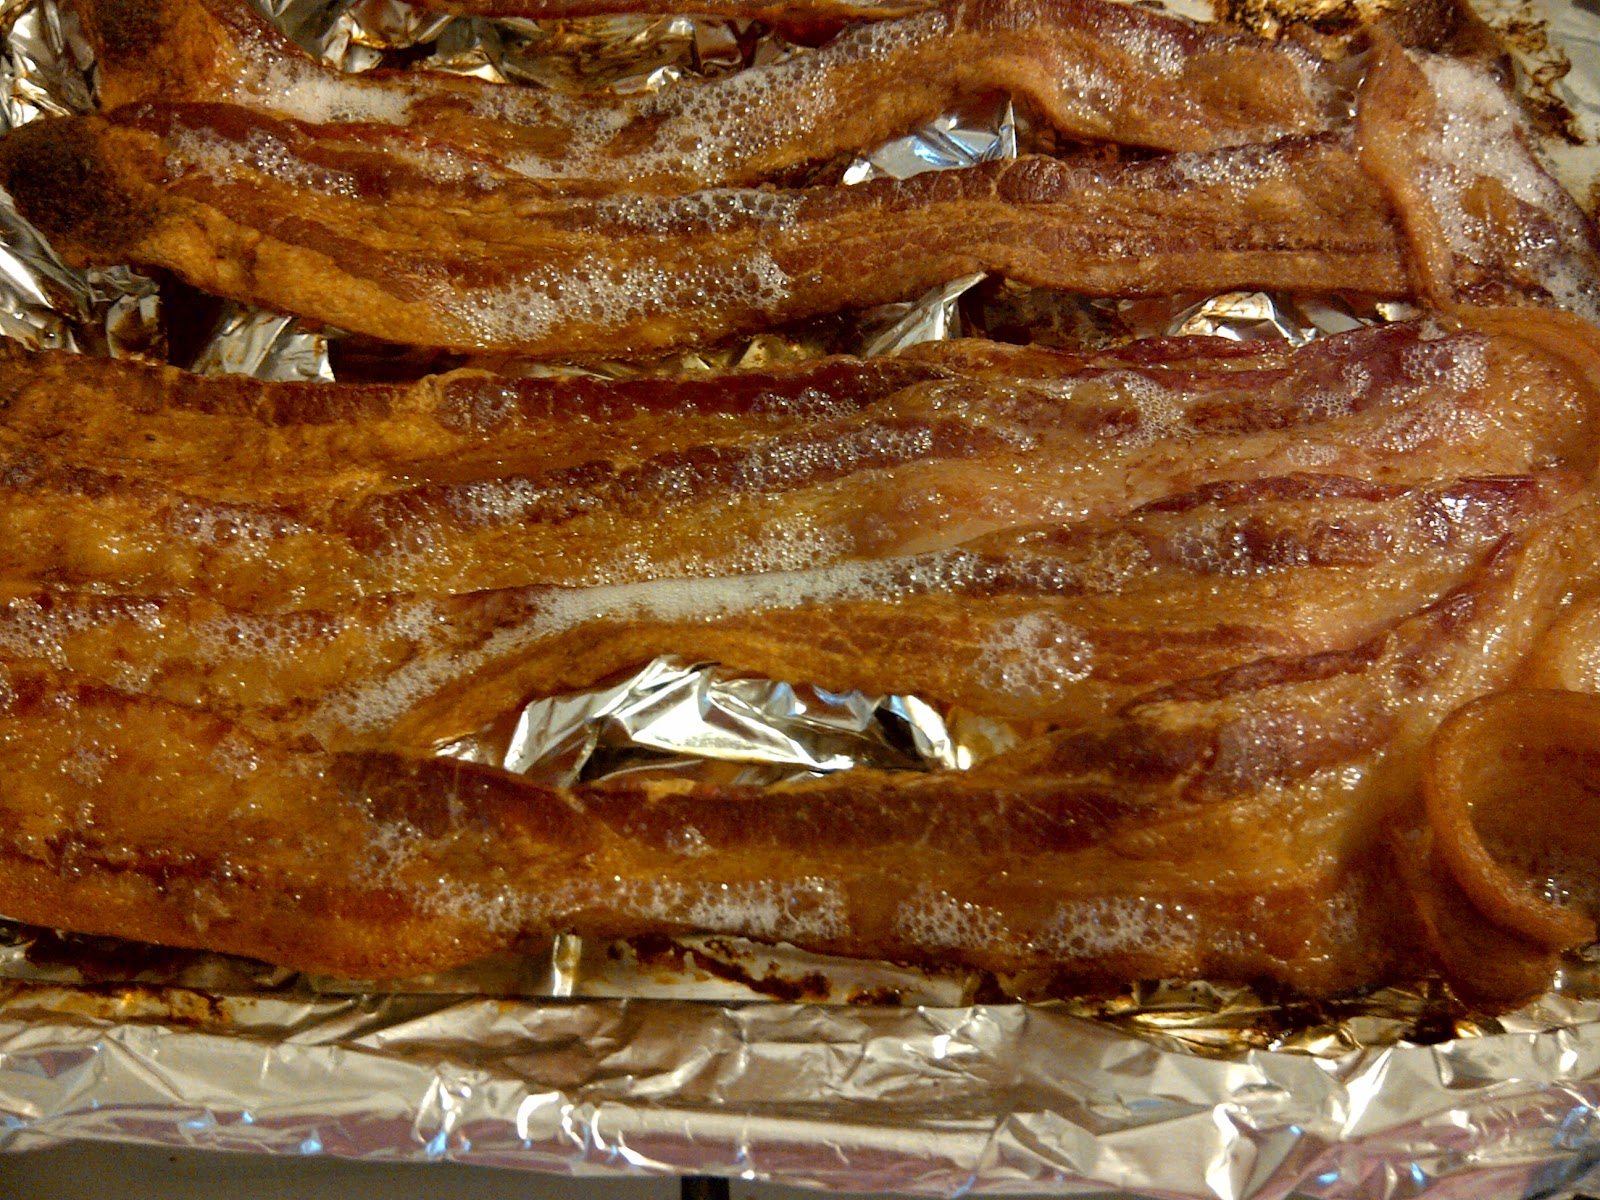
     I heard this rumor that you could make bacon in the oven. It's not just a rumor, you CAN make bacon in the oven!! Guess what the best part is.........you don't have to dodge popping grease and have a burn kit on stand by just in case the grease gets you!!! This is the best new idea (or at least new to ME).
     I think that the world would eat more bacon if everybody knew about this snazzy oven trick.

Oven Fried Bacon

1 package of gluten free bacon
foil
baking sheet

Pre-heat the oven to 400 deg. Line the baking sheet with foil. Take several smaller pieces of foil and crumple them. Lay them on the baking sheet. (this will keep your bacon from sitting down in the bacon grease while it cooks).  Lay the pieces of bacon across the crumpled foil. Bake at 400 deg. for approximately 20 minutes. The exact time will depend on the thickness of your bacon. Really keep an eye on it towards the end of the cooking time so that it doesn't burn. Remove from the oven when crispy and browned.
Oven fried bacon is a new favorite trick


I hope that this trick simplifies your world too!! Enjoy!

-Jessica

T-Shirt Grocery Bags


     I am big on re purposing things if possible. I LOVE antiques and flea markets. I love to go find trinkets and objects that I can find another use for. I sometimes am given t-shirts that are not my size. Sometimes nobody else in the family wants them, so this is a really fun way to put them to good use.
     Taking your own bags to the grocery store is not only good for the earth, but it sometimes even saves you some money. Some stores will give you 5 or 10 cents for each bag that you bring for your groceries. These bags are a fun way to use old t-shirts and possibly even save you money on your next grocery bill.
     They are also great because they are easily washed in the washing machine when they get dirty. Some of the other totes made for the grocery store are a little tricky to get clean.

     The bags are super easy to make.
  1.  First cut the sleeves off of the t-shirt.
  2. Cut the neck out of the shirt.
  3. Using a sewing machine or fabric glue, stitch or glue the bottom of the t-shirt closed. Turn the shirt inside out so that you will have a nice seam when you turn it right side out again.
  4. Use a cute ribbon to cinch the fabric between the sleeve area and neck area to create the handles to the bag.
  5. Use your cute new bag next time you go to the grocery store.
The three bags I made.
Shirt bag made from a child's 4T t-shirt
T-shirt bag made from a child's XL t-shirt.
Shirt made from an adult XL t-shirt.

I know that this has nothing to do with gluten free, but you know that sometimes I feel crafty and need to share. :)  Enjoy showing off some of your personality at the grocery store!!

-Jessica

Pigs in a Poncho


    I searched and searched for an image of a pig in a poncho to put on the blog but I had no luck. I thought it would be pretty funny.......but I guess nobody else has attempted to dress a pig in a poncho. I thought I could find EVERYTHING on the Internet. I guess you guys will just have to settle for no images of funny pigs in ponchos.
     This recipe is like pigs in a blanket meets their friend the taquito. I suppose that calling it a recipe is kind of a stretch.....because it really isn't hard to make at all. This would be a great recipe for the kids to make for dinner. I'm just a big kid at heart and I liked it.

Pigs in a Poncho

1 package gluten free hot dogs
white corn tortillas (warmed)
sliced cheese
toothpicks

Pre-heat the oven to 400 deg. Place the corn tortillas on a microwave safe plate. Microwave for 25-30 seconds. Microwaving the tortillas makes them easier to work with. They will bend without breaking as easily if they are warm.

Take one corn tortilla, place 1/2 of a slice of cheese on the tortilla, place the hot dog on the cheese and roll the tortilla. Secure the end with a toothpick. Place on the baking sheet. Repeat with the rest of the package of hot dogs. Once you have all of your pigs in their ponchos place them into a 400 deg. oven for approximately 15 min. or until the ponchos have turned a golden brown.

Serve with your favorite dippers: Ketchup, mustard, salsa etc.

Crunchy poncho with melty cheese....mmmmm
Even the ketchup and mustard are happy to be near these pigs in ponchos

I hope you enjoy this fun easy treat.

-Jessica

Thursday, February 2, 2012

Butterscotch Blondies


     I had run across a recipe for blondies on Pinterest a couple of weeks ago. I pinned it and figured I would save it for another day. Well today became that day. I went for a long walk and came home craving those blondies.
     I, of course, couldn't deny the need for blondies, so into the kitchen I went to whip them up. They were super easy to make and the end result was SOOOOOOOOOOOOO good!! These are golden bars of heaven. Mmmmmm!
     I do want to put a little disclaimer out there before I give you the recipe. Please be VERY careful when buying the butterscotch chips. Many of the name brand chips are NOT gluten free. So please read labels carefully and call companies to verify that the chips you buy are safe.

Butterscotch Blondies
    
2 cups packed brown sugar
2/3 cup (10 2/3 tbsp) butter
2 eggs
2 tsp vanilla
2 cups gluten free flour mix
1 tsp Xanthan Gum
1 tsp baking powder
1/4 tsp baking soda
2 cups butterscotch baking chips (be sure to verify they are gf)
1 cup chopped nuts (optional)

Preheat the oven to 350 degrees. Spray a 9x13 in. pan with cooking spray and set aside.

In a medium saucepan melt the butter. Add in the brown sugar and stir. Stirring constantly, cook over medium heat until the mixture is smooth. Remove from the heat and cool almost completely.

Stir in the eggs one at a time (be sure the mixture is cool or your eggs will cook). Stir in the vanilla. Add flour, xanthan gum, baking powder, and baking soda mix well. Pour the mixture into the 9x13 pan. Sprinkle butterscotch chips and nuts over the top of the batter. Bake at 350 deg. for 25-30 min. or until a toothpick inserted in the center comes out clean. Cool slightly. Cut the bars while warm, best served slightly warm.

Melt the butter and brown sugar into the sauce pan.
In the same pot stir in the xanthan gum, flour, baking powder and baking soda.
Double check your butterscotch chips to be sure that they are gluten free. Not ALL brands are.
Pour the batter into a greased 9x13 pan. Sprinkle the chips and nuts (if you want nuts, I didn't use them) onto the top of the batter. Bake at 350 deg. for 25-30 min.


    I hope you enjoy the blondies. They are amazing!! Enjoy!

-Jessica

Wednesday, February 1, 2012

Super Bowl Shuffle


     The video above is the cheesy 1985 Chicago Bears Super Bowl Shuffle. I thought that since my blog post title was of the same name I should torture you all with the video as well. It gave me a good laugh.
     So we all know that the Super Bowl is a football game (or at least hopefully we all know that). This year it is the New York Giants vs. the New England Patriots. I don't have an attachment to either team, so I will be watching for the commercials and the yummy food that goes along with the Super Bowl. One of my favorite movies of all time is Ferris Bueller's day off, so I'm super excited about the commercial with Matthew Broderick. They released a five minute version of the commercial this week, so it will be interesting to see how they cut it down for the Super Bowl.
Save Ferris!
     The Super Bowl is always full of game food. I'm sure that each family has their own traditions and recipes that are their "go to" game day foods. My family doesn't have a set game day regimen. However, I believe that it has a theme......cheese. I would say that if we look back over the years our Super Bowl menu is full of cheese. ha
     I thought I would go back through the recipes that I have shared with you thus far and highlight some that would make great game day fare for your team.


Corn Dog Muffins
Oven Baked Frito Chili Pie

Cheese Sticks

Crab Rangoon Dip

Jalapeno Popper Dip

Pizza Monkey Bread
Leftover Loaded Potatoes
5 Ingredient Peanut Butter Monster Cookie Bars

Enjoy the junk food that I have picked out for you and have a great time rooting on your favorite team this weekend. Gooooooo Ferris Bueller!! Oh wait, that's just a commercial.

-Jessica